When you step into the shower and turn the handle, you expect water to come out at the right pressure and the right temperature. But what if it doesn’t? If instead of stepping into a nice, warm shower, you’re dealing with a grinding handle, low water pressure, or inconsistent water temperature, you might be dealing with a faulty shower valve.
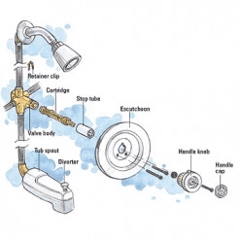
Your shower valve is located within the wall of your shower. Its job is to regulate water temperature, flow, and output to the showerhead, tub spout, and other accessories. Within the valve, there is a cartridge that connects it to the external trim.
While there are some plumbing projects that you should never attempt on your own, others can be done at home by anyone with the right tools and preparation. Repairing a shower valve in your home could be one of them.
In this blog, we address the types of shower valves, how to identify a problem, and offer a step-by-step guide to replacing a shower valve cartridge yourself.
Types of Shower Valves
The shower valves found in homes can vary. The specific type will depend on the faucets of your shower. There are four main different types of shower valves to be familiar with:
Pressure Balancing Valves (PB Valves)
This is one of the most common types of valves that you’ll find in homes. PB valves automatically control the balance of water pressure between hot and cold water and are usually accompanied by single-handle faucets that turn left and right.
As the water passes through, the valve detects the change in water pressure from the hot and cold water lines. It will restrict one side, which results in steady water temperature (typically within two to three degrees). PB valves are also called anti-scald valves, shower pressure valves, or mechanical valves.
Thermostatic Valves (TS Valves)
These are typically found in large showers with multiple shower heads and sprays. TS valves give you control over the water temperature through a temperature preset feature on the valve itself. Not only does this mean it maintains the ideal temperature within one degree, but it also aids in preventing scalding from overly hot water.
On a TS valve, you will find two valves and two handles which allows you to set the temperature without impacting the water volume (and vice versa).
Diverter Valves (DV)
This diverts water away from the bathtub faucet to a showerhead and another sprayer. Showers will only have a DV if there is more than one showerhead or a tub-shower combination.
Transfer Valves (TV)
Any shower that uses multiple faucets or shower heads will have a TV. No matter if water is flowing at the same time or alternating back and forth, a TV will distribute water flow to multiple outlets depending on where you want it.
Signs of Shower Valve Problems
Like any plumbing fixture, shower valves are prone to issues over time. Wear and tear from everyday use, lime and dirt buildup in your water supply, and making changes to your hot water source can all lead to issues with your valve.
Here are some of the major warning signs of a shower valve issue:
Cannot Easily Turn the Faucet
If you feel resistance when you go to turn the shower faucet, this may indicate a problem. It could be something as minor as the valve being misaligned, or something more serious which would require the valve to be replaced. Overall, you should always be able to easily turn and adjust your shower faucet as needed.
Sudden and Unexpected Temperature Changes
Many people have a preferred shower temperature and even a small change from that is noticeable. Slight variations in the water temperature is to be expected, but extreme changes are a cause for concern. This can be the result of buildup of a lime in a shower valve. It could be fixed by cleaning the faucet assembly, including the shower valve.
Decrease in Water Pressure
Similar to changes in temperature, a sudden change in your shower’s water pressure or even an overall loss of water pressure might be an indication of an issue with your valve. This could be caused by a variety of different things, including everyday wear and tear or an internal clog.
Water Leaking From the Shower Head
Shower valves are sealed, so if you notice leaks or drips of water, that means there’s a chance the valve is no longer properly sealed and cannot shut off the shower completely. Any type of leak should be addressed quickly because it can lead to significant damage over time if left unattended.
How to Replace a Shower Valve Cartridge
While replacing a shower valve cartridge is more involved and complex than simply changing the shower head, it can still be done without calling in a professional plumber.
Here are the following steps that our team recommends following:
1. Gather Supplies
Since you will need to access the plumbing components behind the wall, we suggest having the necessary tools on hand:
- Screwdrivers
- Allen wrench
- Channellock pliers
- Needle Nose pliers
- Small hacksaw
- Utility knife
2. Turn Off the Water Supply to the Shower
In most showers, the shut-off valves are typically located to the sides of the valve, one for hot water and one for cold water. You will need to turn off both for this project. If you can’t reach or find the shower line’s water stop, turn off the home’s main water shut-off valve.
3. Block the Drain Opening
Before you begin, cover the tub or shower drain with a cloth or stopper to prevent any screws or small components from falling down the drain.
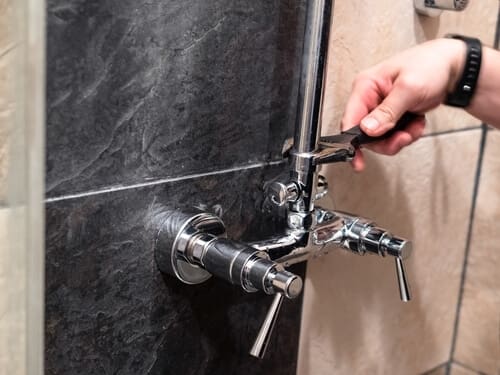
4. Remove the Shower Handle
This must be done before you can access the shower valve. Use an Allen wrench to loosen the screws and pop of the handle. Then, set the handle to the side and keep track of the screws.
5. Remove the Trim Plate
The trim plate, also called the escutcheon trim plate, is a metal panel used to cover the hole in the tiling or wall that leads to the shower valve on the water line.
After you unscrew and remove the trim plate, you now have access to the hole. Some trim plates are held in place by caulking. If that’s the case, remove it with a utility knife. Again, set the trim plate aside and keep track of the screws that go with it.
6. Assess the Area and Cut a Bigger Hole If Needed
Take a look and see if you are able to access and replace a shower valve in the given space. Sometimes the hole behind the trim plate is not wide enough. You will need an approximately 12-inch by 12-inch hole to work with, and if that is not the case, use your tools to enlarge it.
Keep in mind how big your trim plate is, and keep the hole within a size that allows you to recover it.
7. Remove the Valve Clip
Take your pliers and use them to pull the clip out of the top of the valve, which holds the valve in position. Set the clip aside. If your shower valve also uses a retainer nut to hold it in position, remove that component with a wrench and place aside.
8. Remove the Valve
Use your pliers to hold the end of the valve cartridge and pull the valve from the wall. Sometimes you must loosen it first by wiggling it slightly.
9. Install a New Shower Valve Cartridge
Now that the old cartridge is removed, the new one should slide right in as long as it’s the correct replacement part and the rest of the valve assembly is in good condition. Use the new or old retainer clip to secure the cartridge in place.
10. Test for Leaks
Before putting everything back on the wall, turn the water on to test for leaks. If there’s no leaks, you are clear to reinstall the trim and shower handle.
While replacing a shower valve cartridge is more than possible to DIY, if the entire shower valve assembly is damaged or needs repaired, things will get more complicated.
For issues like this and all other plumbing problems, Anderson Plumbing, Heating & Air is here with professional plumbing services that San Diego residents can trust. Contact us or schedule online today.